Monday 3 December 2012

Install Reporting Services in SharePoint Mode on a Multiple Server Farm


image

Install Reporting Services SharePoint Mode in a Multiple Server Farm

The example below will take you through a step by step guide to setup a reporting server in sharepoint integrated mode and connect the reporting server to an existing farm (Sharepoint 2010) farm. 


Step 1 (Installing Sharepoint 2010 WFE on reporting server): 

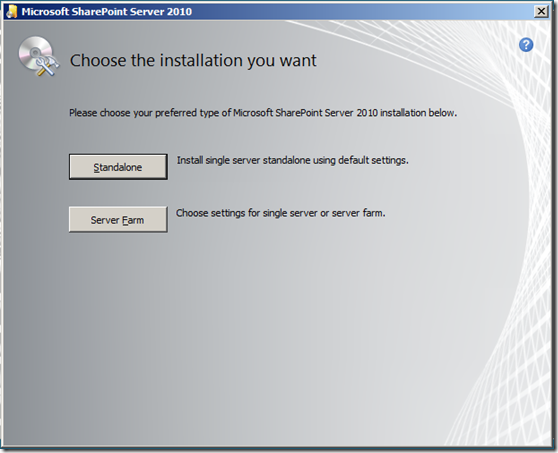
Please make sure to run Sharepoint 2010 PrerequisiteInstaller.exe before installing SharePoint 2010. You will have to install all the Service Packs and any additional patches as per your existing Sharepoint WFE.

Once you have entered the product key and accepted terms and conditions you will be prompted for following screen. Please make sure to select Server Farm. This will install server farm and will allow us to connect to an existing farm later in the installation process. 


Step 2 (Run Sharepoint Product Configuration Wizard): 

Once Sharepoint 2010 is installed then run the product configuration wizard. Please follow the steps below to connect your WFE (Web Front End) to an existing farm.


Specify the location for existing Sharepoint Config database.


On the next screen enter the passphrase to join the WFE to an existing farm. You would have entered this passphrase to setup your sharepoint farm. In case you have forgotten it you can alsways restore it using PowerShell Commands

Step 3 (Installing SQL Server 2012 - SSRS in Sharepoint Integrated Mode): 


 Please select SQL Server Feature Installation to add any new features to your existing or new SQL Server Installation


As we are installing SSRS in Sharepoint integrated mode so we don't need to check and Install native mode on the server. Reporting Services - Sharepoint is the option we want to select to have SSRS running in Sharepoint integrated mode.


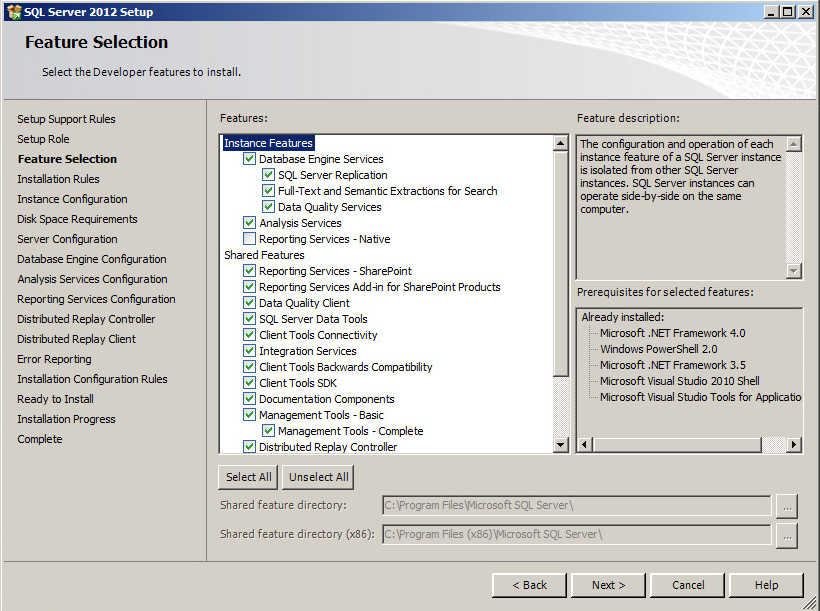
As we are installing just the Sharepoint integrated mode thats why the top option (native mode) is disabled. Install only option as below will be selected by default. Hit Next and wait for SQL Server to Install. 


Now we have both Sharepoint WFE and SQL Sever (SSRS in sharepoint integrated mode) Installed. 

Step 4 (Installing SQL Server 2012 - Reporting Services Add in): 

Install the Add In on all WFE. You will not need to install this on your reporting server if you have successfully executed above Steps on your reporting server. 


Step 5 (Installing Reporting Server Shared Service): 

Execute the following commands in Sharepoint 2010 Management Shell.
these Commands will be executed on the reporting server which has SSRS installed in Sharepoint Integrated Mode.


Step 6 (Starting SQL Server Reporting Services Service): 

Start the SQL Server Reporting Services Service from central admin under System Settings. The service will be available under the reporting server so make sure you have the correct server selected in order to start the service. 


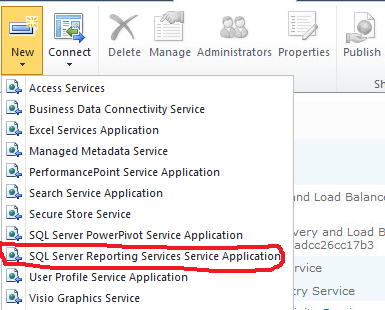
Step 7 (Create the Reporting Services Service Application): 

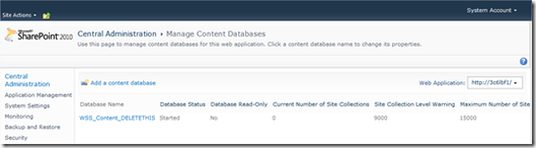
The next step is to create a new service application. Go to Central Admin > Application Management > Manage Service Applications.


Step 8 (Activate Reporting Server Integration Feature): 

Go to your root site collection > Site Settings > Site Colelction Features and activate Reporting Server Integration Feature. 


Once you have carried out above steps you will have your environment ready. If you are using kerberos then you will have to carry out some more settings for your report server to work. I will be blogging about them soon. 

Resetting Sharepoint 2010 Passphrase


The existing passphrase cannot be recovered but you can always reset your farm to use new passphrase. Please follow the steps below to reset passphrase. 
First log onto your SharePoint server and go to Start | All Programs | Microsoft SharePoint 2010 Products | SharePoint 2010 Management Shell also right click the link and run as administrator.
Next step at the PowerShell prompt input
$passphrase = ConvertTo-SecureString -asPlainText –Force
You will be prompted to input a new passphrase in plain text. Next step is to input
Set-SPPassPhrase -PassPhrase $passphrase –Confirm
After inputting the command above you will be asked to reenter the new passphrase this time it will be hashed then it is just a simple case of entering Y(Yes) N(No) to complete the change you can see the whole process illustrated below

7 Easy Steps to Enable Kerberos for SSRS running in Sharepoint Integrated Mode - SQL 2012

7 Easy Steps!


  • Enable Kerberos on your Sharepoint Web Application (from central admin)
  • Enable the Claims to Windows Token Service in Sharepoint (Make sure the service is running on all Web Front Ends)
  • Create an HTTP SPN for the account that is running Portal application Pool
  • Create a dummy SPN for the account that is running the service application
  • Create an MSOLAPSvc.3 SPN for the service account running Analysis Services
  • Configure Constrained Delegation for the Service Application account to Analysis Services
  • Configure Constrained Delegation for the Application Server machine. 

Friday 30 November 2012

SQL Server Reporting Services Service not installed after running Install-SPRSService and Install-SPRSServiceProxy


I was recently setting up a reporting server running in sharepoint integarted mode connected to an existing farm. After installing SQL 2012 in SharePoint integrated mode I executed  following commands (Install-SPRSService, Install-SPRSServiceProxy) to setup the reporting shared service in sharepoint. The command executed successfully but i was unable to see  SQL Server Reporting Services Service under system settings in Central AdminI went through the sharepoint logs and couldn't find anything in there. NO ERRORS. After spending a lot of time i figured out the solution. 

SOLUTION:


I downloaded Microsoft® SQL Server® 2012 Reporting Services Add-in for Microsoft® SharePoint® Technologies 2010 and installed on all WFE in the farm so they can be upgraded to use SQL 2012 Reporting Service.After successfully installing it and running the  Install-SPRSService, Install-SPRSServiceProxy commands again the service appeared under system settings of the REPORT SERVER. 


Wednesday 20 June 2012

Sort Folders (Custom Order) in SharePoint Document Library

One of my friend recently asked me this question about sorting the folders (not in alphabetical order) in a document library. The sort order has to be custom and user should be able to specify the order in which folders should appear. Example sort order

Top
Middle
Bottom


In order to implement this you can create a new folder content type and add an order column to this content type. You do need to have the appropriate rights to do so.

The steps would be as follows.


  • Go to Site Actions
  • Go to Site Settings
  • Go to Site Content Types
  • Click Create New
  • Give it a name such as Folder Order
  • Select Parent Content Type from as of Folder Content Types
  • Select Folder as the Parent Content Type
  • You can create a new group or leave it in custom content types
  • Click OK
  • At the content type settings click Add from new site column
  • Create a site column called Item Order or something similar, select the type as Number
  • Click OK
  • Go to the list where you want the folders to be ordered
  • Go to the list settings
  • Go to Advanced Settings
  • Select allow management of content types
  • Select No for display new folder command on the new menu
  • Click OK
  • You should now see an area called content types, leave the document as is
  • Click Add from existing site content types
  • Select the Folder Order (or whatever you named it)
  • Click OK


That's it you can now create a folder structure with the order column and order your items as you need. 

Tuesday 13 March 2012

PowerPivot Gallery shows Red X's for Icons

After publishing PowerPivot workbooks to the PowerPivot Gallery, the gallery shows Red X's instead of an image of the workbook.

When a .xlsx is uploaded or published to Gallery, behind the scene, a process (GetSnapshot.exe) is created that ultimately generates the snapshot image (.png file) and saves in C:\Windows\temp. Here are some of the troubleshooting steps for this scenario:

1. Make sure Excel services is rendering workbooks.

2. If you you have Internet Explorer 9 installed on your Farm servers you need to install Sql 2008 R2 SP1 for PowerPivot for SharePoint.

a. if you cannot upgrade to SP1 you can manually make the fix with the below steps.

In %Common Files%\Microsoft Shared\Web Server Extensions\14\Template\Layouts\PowerPivot you will find a file called ASRGLoader.htm.


Make a copy of the file and call it ASRGLoader.orig.htm (this is so that if you mess up anything you can revert :)

Open asrgloader.html in notepad.

Search for a function called onXLFrameLoad

Replace the line

if (ewaFrame.document.readyState == 'complete') {

with the line
if ( (ewaFrame.document.readyState == 'complete') || (ewaFrame.document.readyState == 'interactive') ) {

. A simple test to see if a getsnapshot is being spawned is to:

a. start task manager on your Web Frong End and click “show processes from all users”

b. go to the document library and go to view “all documents” and just edit properties. This should cause GetSnapshot.exe to fire and you should see it under task manager and can see the account it is running under

4. You can run GetSnapshot.exe manually and pass in parameters site, url, guid (note guid can be whatever). One caveat though is that the .info and .png file are created in the user’s local temp directory if they are logged in (as I was)…otherwise it will be saved in the c:\windows\temp. You cannot use this method to manually create/replace a thumbnail. This will only tell you if GetSnapshot failed (maybe b/c it took too long or something)

a. http://blogs.msdn.com/b/mtn/archive/2010/10/15/how-to-manually-refresh-powerpivot-gallery-thumbnails.aspX

5. Look in C:\Windows\Temp for the thumbnail (.png) and the log file .INFO; .INFO file should report success or failure messages

6. The workbook might not contain any embedded PowerPivot data. If so, a thumbnail will not be generated.

7. The workbook might contain more than one data source. If so, a thumbnail will not be generated.

. If the file is a .rdl file, then the data source must be embedded in the report and it must use the PowerPivot OLEDB provider and point to a workbook (.xlsx) that is contained in the same document library (i.e. the Gallery). If not, a thumbnail will not be generated.
9. Verify Alternate Access Mappings are setup correctly.

10. Add the PowerPivot site to the trusted intranet sites for the account running Getsnapshot.exe

11. disable loopback check. http://support.microsoft.com/kb/926642

12. remove the check box for refresh on open in the workbook connection properties

13. Open Advanced Settings for the Document library(PowerPivot Gallery).

Under Opening documents in the browser change the setting to "open in the Browser".
(This option worked for me)

Friday 2 March 2012

There are no activities in your newsfeed: SharePoint 2010


You set up your My Sites host, and the newsfeed web part on My newsfeed is not showing any news feeds and displaying “STAY CONNECTED ! There are no activities in your newsfeed.” message

This is a common frustration out there in the SharePoint user community. I have seen lots of posts from people pulling their hair out trying to get Activities to show up.

This could be because you have not enabled the news feed for mysites. Please follow the steps below to do so.

1. Go to central admin user profile service.

2. Under My Site Settings click on Setup Mysites

3. Enable newsfeed

Enable_newsfeed_on_mysites

4. Enable Activity Feed Job

a) On the Central Administration Web site, on the Quick Launch, click Monitoring.
b)
On the Monitoring page, in the Timer Jobs section, click Review job definitions.
c)
On the Job Definitions page, in the list of timer jobs, click User Profile Service Application – Activity Feed Job.
d)
On the Edit Timer Job page, in the Recurring Schedule section, specify when you want the timer job to run, and then click Enable.

Once the job is finished Stay connected message will disappear and you should start seeing the activity feed.


Wednesday 29 February 2012

Handy shortcut key for visual studio code navigation

Ctrl + - and the opposite Ctrl + Shift + -

Move cursor back (or forwards) to the last place it was.

No more scrolling back or PgUp/Dwn to find out where you were.


Tuesday 14 February 2012

SPRello: A trello like interface for organizing items

An interface for organising items in SharePoint Lists - inspired by http://trello.com

sprello-screenshot1.png

A simple card/post it note like UI for displaying and organising items in SharePoint lists.


Monday 13 February 2012

Creating Staff Directory Web part

Recently I had requirement to create a staff directory web part which intranet users can use to search for staff members in the organization. The web part displayed below use the people search to display results.


Search Results:


SCRIPT:

<script type="text/javascript" language="javascript">

//function for enter on keyboard and apostrophes in search strings
function txtWildPeopleFinder_KeyDown(e) {
if (e.keyCode == 13 || e.keyCode == 10) {
e.returnValue = false;
doWildPeopleSearch();
return false;
}
else {
return true;
}
}

function escapestr(str) {
return str.replace("'", "%22");
}

//staff search
function doWildPeopleSearch() {

var firstname = escapestr(document.all["firstname"].value);
var lastname = escapestr(document.all["lastname"].value);
var department = escapestr(document.all["department"].value);

var url = "";

if (firstname == "" && department == "" && lastname == "") {
alert ("Please enter first name, last name or department to search for a staff member.")
return;
}
// buliding url string
if (firstname != "") {
url += "FirstName%3A" + firstname;
}
if (lastname != "") {
if (url != "") url += "%20";
url += "LastName%3A" + lastname;
}
if (department != "") {
if (url != "") url += "%20";
url += "Department%3A" + department;
}

var staffSearchResultsPageUrl = "/search/Pages/peopleresults.aspx";

window.location = staffSearchResultsPageUrl + "?k=" + url;
return;
}
</script>

CSS:

<style type="text/css">
.label {
float: left;
width: 80px;
}
.staffDirectory div {
padding:5px 0px 0px 0px;
}
</style>

HTML:

<div class="staffDirectory">
<div>
Enter all or part of a name e.g. A will find all names beginning with A
</div>
<div class="label">
First Name:</div>
<div class="">
<input name="firstname" id="firstname" onkeydown="txtWildPeopleFinder_KeyDown(event)"
type="text" size="25" maxlength="55" /></div>
<div class="label">
Last Name:</div>
<div>
<input name="lastname" id="lastname" onkeydown="txtWildPeopleFinder_KeyDown(event)"
type="text" size="25" maxlength="55" /></div>
<div class="label">
Department:</div>
<div>
<input name="department" id="department" onkeydown="txtWildPeopleFinder_KeyDown(event)"
type="text" size="25" maxlength="55" />
</div>
<div>
<input type="button" value="Search" onclick="doWildPeopleSearch()"/>
</div>
</div>


Thursday 9 February 2012

The responsive HTML5 master page for sharepoint 2010

Today I came across this blog about html5 responsive master page for sharepoint 2010 from kyle schaeffer. Handy,looks awesome and worth sharing.

“v5.master” is a simple HTML5 master page designed for SharePoint 2010. It makes good use of the amazing new features of both HTML5 and CSS3, including CSS3 media queries. The master page is extremely simplistic in nature, and is truly meant to serve as a framework for building your own SharePoint 2010 customizations.

SharePoint Gets Responsive

SharePoint has a knack for being rigid and difficult to customize. I’ve been working with responsive layouts for a while now, but the nature of SharePoint has thus far prevented me from making something that is as flexible as, say, this WordPress blog you’re reading right now. It’s easy-peasy to do this in WordPress, but SharePoint simply does too much. When you create a layout in SharePoint, you’re creating a layout that encompasses much more than just pages: you’ll have to contend with pages, web parts, lists, libraries, blogs, wikis, search, meeting workspaces, team sites, calendars, and the list goes on. With so much content to contend with, creating something that can contract to any width is a tall order to say the least.

To me, at least, the answer was simple: ignorance. I’m ignoring every part of SharePoint that I don’t care about. 90% of the sites that I create in SharePoint are publishing sites: public-facing with a focus on pages, navigation, and web parts. Now, that’s a list I can handle. The v5 master page uses a fluid layout that drops to a single column when the display size shrinks below 800 pixels in width. Check out the screens to see the flexibility in action:

Large/Desktop Displays:

Medium/Tablet Displays:

Small/Mobile Displays:

Read More


Restoring sharepoint site from content db backup - Sharepoint 2010

If web application doesn't exist on on your target server then create one.

Restore the content database backup (full database backup) on your WSS_Content on target server.

DETATCH ANY CONTENT DATABASES FROM THE TARGET WEB APPLICATION IN Central Administration

Application Management, select “Manage Content Databases” under the Database heading.

Select the target web application in the “Web Application” drop-down box at the top left, if it is not already selected.

Picture

Ensure there are no content databases for the target web application. If the list contains any content databases, click on each content database name. On the “Manage Content Database Settings” screen, select the “remove content database” checkbox and click OK.
Picture
Note: Make sure to log into your SharePoint 2010 SQL Server Instance at your convenience and delete any orphaned content databases that were removed from the web application in the step above.

ADD CONTENTDB THE CONTENT DATABASE USING STSADM.EXE

Using the stsadm.exe tool, run the addcontentdb command using the syntax below:

stsadm –o addcontentdb –url [URL] –databasename [DBName]
Picture
Once executed, the command window will update with a progress indicator as seen in the screenshot above. Once it is complete, you will either receive one of two messages:

Operation Completed Successfully


Creating SPNs and Kerberos Delegation - Reporting services in sharepoint integrated mode

There are a few prerequisites to setting up Kerberos delegation.

  1. Both sharepoint web sites and report server are now installed and configured.
  2. All computers accessing the application must be in the same domain.
  3. Kerberos ports must be open if going through a firewall.
  4. Client browsers must be setup to allow integrated authentication.
  5. Clients must be domain users.
  6. All clients must be running Windows 2000 or greater.
  7. All client’s browsers must be IE 5+


Probably the most likely culprit for not getting this Kerberos authentication to work is improper or duplicate SPN’s. Duplicate SPN’s can easily be created if the person that install say, SQL, is a domain admin and decides to run the setup under their domain admin account. What happens in this scenario, is the SPN for SQL server is automatically registered under that Domain Admin’s user account. Even if they go back and change the service to run under localsystem, Active Directory will still know of a SPN to SQL01′s SQL Server Service. This creates a duplicate SPN and will break your entire setup.

Duplicate spns can be found using following command in command prompt

setspn -x

if you see any duplicate spns then delete them by running follwoing command

setspn -d [SPN TO DELETE] [OBJECT FRM WHICH YOU WANT TO DELETE IT]

Example c:\>setspn -d MsSQLSvc/SQL01:1433 domainnamedomainadmin

Creating Necessary SPN’s
if sharepoint server is WEB01 and reporting server is REP01 then we need to setup following SPNS with both NETBIOS and FQNs

REP01:
1. SETSPN –a HTTP/REP01.xyz.local:80 [REPORTING SERVICE DOMAIN ACCOUNT]
2. SETSPN –a HTTP/REP01.xyz.local [REPORTING SERVICE DOMAIN ACCOUNT]
3. SETSPN –a HTTP/REP01 [REPORTING SERVICE DOMAIN ACCOUNT]
4. SETSPN –a HTTP/REP01:80 [REPORTING SERVICE DOMAIN ACCOUNT]

We will also need to set spn for the sql service i.e.

SETSPN –a MSSQLSvc/[REP01].xyz.local [SQL SERVICE ACCOUNT]
SETSPN –a MSSQLSvc/[REP01].xyz.local:1433 [SQL SERVICE ACCOUNT]
SETSPN –a MSSQLSvc/[REP01] [SQL SERVICE ACCOUNT]
SETSPN –a MSSQLSvc/[REP01]:1433 [SQL SERVICE ACCOUNT]


WEB01:

On the web end we need to specifiy SPNs for each sharepoint site including the central admin

SETSPN –a HTTP/[WEB ADDRESS]:[PORT NUMBER] [APP POOL DOMAIN ACCOUNT]

Allowing Constrained Delegation
1. Log on to the domain controller.

2. On the domain controller, click Start, click Administrative Tools, and then click Active Directory Users and Computers.

3. Expand the domain node, and then click Users.

4. Right-click the application pool identity user account, and then select Properties.

5. On the Delegation tab, verify that the Trust this user for Delegation to specified Services only option is selected.

6. Select Use Kerberos Only.

7. Click Add.

8. Click Users or Computers.

9. Enter the domain and user name of the account running the service that you want to have accept Kerberos credentials, and then click OK.

10. The Available Services values will appear for the account that you selected. Select the appropriate service and click OK.

Note:

This will normally be the Web service associated with the application pool identity that you are modifying or any services associated with data sources that you want to be able to access using Kerberos authentication.
1. Repeat steps 8 through 10 for each service that you want to accept credentials from this account.

2. Click OK to close the account properties dialog box.